> ## Documentation Index
> Fetch the complete documentation index at: https://docs.flagsync.com/llms.txt
> Use this file to discover all available pages before exploring further.
# Targeting and Rollouts
> Control feature flag distribution in FlagSync with targeting and rollouts.
## Targeting Options
FlagSync offers flexible ways to roll out feature flags:
Serve a variant to everyone.
Target specific users or groups using custom attributes.
Distribute variants by percentage across users.
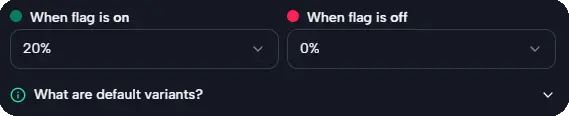
### All Users
Serve a single variant to every user, ensuring a consistent experience with default settings. This approach relies on:
* **Disabled Variant**: Applied when the flag is off, serving as a fallback (e.g., "0% discount" for all).
* **Enabled Variant**: Applied when the flag is on, unless overridden by targeting or rollouts (e.g., "20% discount" for all).
Defaults provide a safety net—e.g., reverting to "0% discount" during system issues.
 ### User Segments
Target specific users by passing custom attributes via the SDK and defining rules in the dashboard to match those attributes. For example:
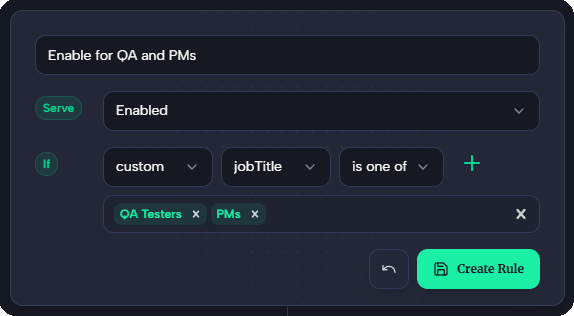
* **Use Case**: Create a rule to serve a beta feature to "QA Testers" and "PMs" while others see the baseline.
* **Implementation**: Provide attributes in the SDK—FlagSync auto-populates the rule creation UI with these attributes for targeting.
```typescript theme={null}
import { FlagSyncFactory } from '@flagsync/js-sdk';
const factory = FlagSyncFactory({
sdkKey: 'your-sdk-key',
core: {
key: 'user123',
attributes: { jobTitle: 'QA Tester', isVIP: false }
}
});
```
In a real app, these values (e.g., `user123`, `QA Tester`) are typically sourced from a user or session object.
### User Segments
Target specific users by passing custom attributes via the SDK and defining rules in the dashboard to match those attributes. For example:
* **Use Case**: Create a rule to serve a beta feature to "QA Testers" and "PMs" while others see the baseline.
* **Implementation**: Provide attributes in the SDK—FlagSync auto-populates the rule creation UI with these attributes for targeting.
```typescript theme={null}
import { FlagSyncFactory } from '@flagsync/js-sdk';
const factory = FlagSyncFactory({
sdkKey: 'your-sdk-key',
core: {
key: 'user123',
attributes: { jobTitle: 'QA Tester', isVIP: false }
}
});
```
In a real app, these values (e.g., `user123`, `QA Tester`) are typically sourced from a user or session object.
 Use `key` instead of `custom` to target the unique identifier (e.g., `user123`).
### Percentage Rollouts
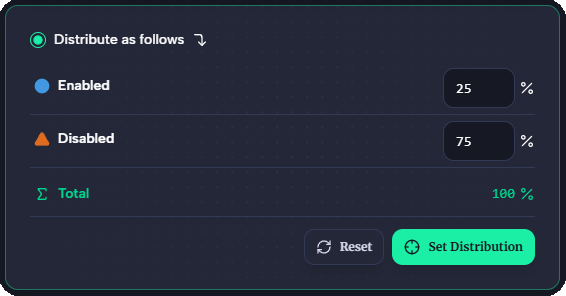
Distribute variants by percentage to control rollout scope and risk. FlagSync simplifies this with:
* **Allocation**: Set splits (e.g., 25% each for four variants)—must total 100%.
* **Use Case**: Allow gradual releases—e.g., 10% rollout to test stability.
Users are bucketed deterministically, ensuring they receive the same variant consistently during the rollout.
Use `key` instead of `custom` to target the unique identifier (e.g., `user123`).
### Percentage Rollouts
Distribute variants by percentage to control rollout scope and risk. FlagSync simplifies this with:
* **Allocation**: Set splits (e.g., 25% each for four variants)—must total 100%.
* **Use Case**: Allow gradual releases—e.g., 10% rollout to test stability.
Users are bucketed deterministically, ensuring they receive the same variant consistently during the rollout.
 ## Next Steps
* Create a flag in [Creating Flags](/flags/create-flag).
* Learn about metrics in [Metrics: Overview](/metrics/overview).
* Run experiments in [Creating Experiment](/experiments/create-experiment).
## Next Steps
* Create a flag in [Creating Flags](/flags/create-flag).
* Learn about metrics in [Metrics: Overview](/metrics/overview).
* Run experiments in [Creating Experiment](/experiments/create-experiment).